This is an elaboration of my post 'Interactive Web Based Model Viewing - Part Uno' - it looks at using the Autodesk Seek Viewer to view Revit models online - here is the original post.
It was a little tricky to get this to embed into my blog but I think I got it workable. By now, you should have already been prompted to run the Autodesk Seek Viewer add on and you should be able to see the model in the viewing window. If not, here is the direct link to the Autodesk Seek Viewer; just extract the .zip file and run the .exe file.
This example is using one of the sample projects from RAC 2011. As you can see this can be quite a valuable and lightweight tool. Right click in the viewing window somewhere and you can view the various settings and tools you have to play with - I especially like the Interactive Slicer.
Go ahead - have at it! It works very similiar to Revit as in panning, zooming, etc.

Thursday, February 18, 2010


Split-Face with Wall Reveal
Have a complex wall/reveal design? Maybe EIFS reveals? Let's say you have a reveal in a wall and you need to have the portion of the wall above the reveal 'Color A' and below it 'Color B' - when you try and use your Paint Bucket it wants to select the entire face of the wall (Figure A), not the individual faces (above and below the reveal).
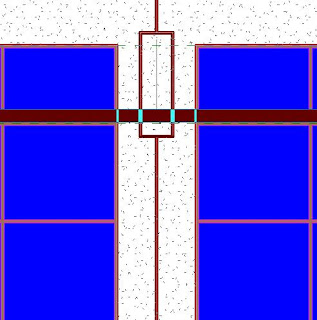
So the next logical step would be to use the Split-Face tool to split the wall face at the reveal location so you can have multpile faces to paint. After further investigation and frustration we see that when we select the wall face to split it, it automatically has the reveal edges assigned as a face border - so we can't split our faces along those lines. Now we could offset our split-face lines a teenie bit off the border lines but that would be cumbersome and annoying.
Well While going through this I discovered an long standing bug in the software, try this:
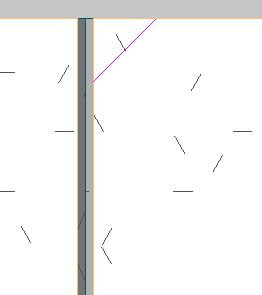
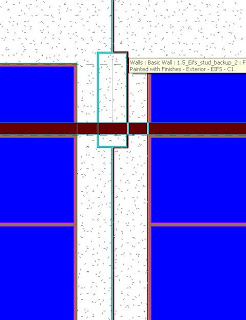
So the next logical step would be to use the Split-Face tool to split the wall face at the reveal location so you can have multpile faces to paint. After further investigation and frustration we see that when we select the wall face to split it, it automatically has the reveal edges assigned as a face border - so we can't split our faces along those lines. Now we could offset our split-face lines a teenie bit off the border lines but that would be cumbersome and annoying.
Well While going through this I discovered an long standing bug in the software, try this:
- Use your Split-Face tool and pick the wall face you would like to Paint.
- Split the face of the wall anywhere, I do it in a top or bottom corner and create a tiny 1/16"x1/16" wedge (Figure B). Select Finish Sketch.
- Now you will be able to pick the individual faces of the wall created by the reveal (Figure C).
Thursday, February 11, 2010
Curb and Gutter Along Topo
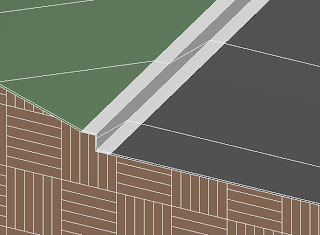
Want to create a curb and gutter that actually follows your topo elevations? Tired of using complex slabs or sloped sweeps? Well here's an alternative way that creates a curb and gutter to follow the EXACT topography of your site plan! The only downside I have found to this method is that you need to be sure your topography is final (or darn close) and won't change at the areas of the curb and gutter - it can be a nightmare to change after the fact - you'll see why as you go through this tutorial.
Happy Curbing!

Happy Curbing!
- Create your toposurface as normal - making sure your elevations, etc are nailed down prior to moving on the the next step. :)
- Use the Split Surface tool to split the surface into 3 parts, forming your road - you'll have to do this twice as the Split Surface tool only allows you to split the surface into two parts each time.
- On each side of the road, use the Split Surface tool again to split the surface into (2) 6" (or whatever your specs) pieces or slivers outward from each side of your road - this will later become the top of your curb and your gutter.
- Go to an elevation view and move the road, and the two inside most 6" pieces (your gutters) down your required curb height.
- Assign the appropriate materials to the roadway, curbs and topo (asphalt, concrete and grass) - now you can see things shaping up.
- Now, using the Split Surface tool again, Split each of the four 6" spaces 1/8" from the their shared edge - creating (2) 1/8" slivers of curb in between each of the two 6" pieces.
- Finally, go to a 3D view and use the Merge Surfaces tool and select the lower 1/8" curb piece and then the upper 1/8" curb piece - this will join the two 1/8" pieces to create your curb wall.
Friday, August 21, 2009
Retro-Power Boost
In this day and age of Windows Vista, 64 Bit Operating Systems, and unlimited RAM utilization capabilities (fheww that was a couple of big words there) and Revit file size inflation, what happens to the little guys who still function using that age old fabled Windows XP or, heaven forbid, Windows... dare I say it?
...2000 or Me?
There I said it.
With our 4Gb of RAM slots but with only the 2Gb that the cotton-picken software will let us utilize and with file sizes inflating by the minute, no second, and programs requiring more and more RAM everytime we blink our eyes, it seems there's some sort of bail-out needed here.
Now, of course we can always install a 64bit OS on our 32bit machines but what's the point? 2 Gigs is 2 Gigs no matter what bit OS your working on if your still on a 32bit machine. But let's say you don't want to go out and buy that 64bit machine just yet and bask in the sweet, triumphant glow of unlmited RAM capabilites.
There's one more last ditch effort available, one "last line of defense" if you will...
The 3GB Switch...
dun dun dun... ...corney? Yeah I know.
The 3Gb switch will unlock that previously unreachable 3rd Gig of RAM for your computable gratification:
*This is and exerpt from guidelines and instructions published by Autodesk. For more information regarding the 3Gb Switch and Revit, visit the Autodesk website and search "The 3Gb Switch and Revit"
Before You Enable the 3GB Switch
You will need to verify that the paging file size is optimized for your system. The paging file should at least be the size that is recommended for Windows and at most the size should be two times the amount of installed RAM. Follow these steps:
1. On the Start menu (Windows), click Settings > Control Panel.
2. In Control Panel, double-click System.
3. In the System Properties dialog box, click the Advanced tab.
4. Under Performance, click Settings.
5. In the Performance Options dialog box, click the Advanced tab.
6. On the Advanced tab, under Virtual Memory, click Change.
7. I n the Virtual Memory dialog box, change the Initial and Max values to 4092 (2 * 2GB) for a 2GB machine.
8. Click Set.
9. Click OK to close each dialog box.
Enabling the 3GB Switch
1. Right-click My Computer. Click Properties.
2. In the System Properties dialog box, click the Advanced tab.
3. On the Advanced tab, under Startup and Recovery, click Settings.
4. In the Startup and Recovery dialog box, under System startup, click Edit. The Windows boot.ini file will be opened in Notepad.
5. Save a renamed copy of your boot.ini file somewhere on your computer in case you need to revert back to your original version of the file. Note: Boot.ini files may be different from computer to computer.
6. Highlight the following line in the boot.ini file:
multi(0)disk(0)rdisk(0)partition(2)\WINDOWS="Microsoft Windows XP Professional" /fastdetect
7. Copy (Ctrl-C) and paste (Ctrl-V) the line just below the original. Note: Your exact text string may be different from the text string in this document. So be sure to copy the text string from your boot.ini file, not the text string shown here.
8. Modify the copied line to include “ /3GB”, as shown in the example below. Note: Do not overwrite any existing lines.
multi(0)disk(0)rdisk(0)partition(2)\WINDOWS="Microsoft Windows XP Professional 3GB" /3GB /fastdetect
9. Save the boot.ini file and close Notepad.
10. Click OK to close each dialog box.
11. Reboot your computer.
12. During startup, select the 3GB option. If you do not select the 3GB option, the system will default to the 2GB total memory setting.
If there are problems at startup, you may need to update some of your drivers.
Verifying that the 3GB switch is enabled
Start a Revit session, and then open the new journal text file that was created. The Journals folder can usually be found in the C:\Program Files\Autodesk Revit Building X\Journals directory. Note: Revit Building is used as an example. If you are using Revit Structure, the folder will be named "Revit Structure." If you are using Revit Systems, the folder will be named "Revit Systems." Near the beginning of the journal, check to make sure that the TotalVirtualMemorySize equals approximately 31456000.
...2000 or Me?
There I said it.
With our 4Gb of RAM slots but with only the 2Gb that the cotton-picken software will let us utilize and with file sizes inflating by the minute, no second, and programs requiring more and more RAM everytime we blink our eyes, it seems there's some sort of bail-out needed here.
Now, of course we can always install a 64bit OS on our 32bit machines but what's the point? 2 Gigs is 2 Gigs no matter what bit OS your working on if your still on a 32bit machine. But let's say you don't want to go out and buy that 64bit machine just yet and bask in the sweet, triumphant glow of unlmited RAM capabilites.
There's one more last ditch effort available, one "last line of defense" if you will...
The 3GB Switch...
dun dun dun... ...corney? Yeah I know.
The 3Gb switch will unlock that previously unreachable 3rd Gig of RAM for your computable gratification:
*This is and exerpt from guidelines and instructions published by Autodesk. For more information regarding the 3Gb Switch and Revit, visit the Autodesk website and search "The 3Gb Switch and Revit"
Before You Enable the 3GB Switch
You will need to verify that the paging file size is optimized for your system. The paging file should at least be the size that is recommended for Windows and at most the size should be two times the amount of installed RAM. Follow these steps:
1. On the Start menu (Windows), click Settings > Control Panel.
2. In Control Panel, double-click System.
3. In the System Properties dialog box, click the Advanced tab.
4. Under Performance, click Settings.
5. In the Performance Options dialog box, click the Advanced tab.
6. On the Advanced tab, under Virtual Memory, click Change.
7. I n the Virtual Memory dialog box, change the Initial and Max values to 4092 (2 * 2GB) for a 2GB machine.
8. Click Set.
9. Click OK to close each dialog box.
Enabling the 3GB Switch
1. Right-click My Computer. Click Properties.
2. In the System Properties dialog box, click the Advanced tab.
3. On the Advanced tab, under Startup and Recovery, click Settings.
4. In the Startup and Recovery dialog box, under System startup, click Edit. The Windows boot.ini file will be opened in Notepad.
5. Save a renamed copy of your boot.ini file somewhere on your computer in case you need to revert back to your original version of the file. Note: Boot.ini files may be different from computer to computer.
6. Highlight the following line in the boot.ini file:
multi(0)disk(0)rdisk(0)partition(2)\WINDOWS="Microsoft Windows XP Professional" /fastdetect
7. Copy (Ctrl-C) and paste (Ctrl-V) the line just below the original. Note: Your exact text string may be different from the text string in this document. So be sure to copy the text string from your boot.ini file, not the text string shown here.
8. Modify the copied line to include “ /3GB”, as shown in the example below. Note: Do not overwrite any existing lines.
multi(0)disk(0)rdisk(0)partition(2)\WINDOWS="Microsoft Windows XP Professional 3GB" /3GB /fastdetect
9. Save the boot.ini file and close Notepad.
10. Click OK to close each dialog box.
11. Reboot your computer.
12. During startup, select the 3GB option. If you do not select the 3GB option, the system will default to the 2GB total memory setting.
If there are problems at startup, you may need to update some of your drivers.
Verifying that the 3GB switch is enabled
Start a Revit session, and then open the new journal text file that was created. The Journals folder can usually be found in the C:\Program Files\Autodesk Revit Building X\Journals directory. Note: Revit Building is used as an example. If you are using Revit Structure, the folder will be named "Revit Structure." If you are using Revit Systems, the folder will be named "Revit Systems." Near the beginning of the journal, check to make sure that the TotalVirtualMemorySize equals approximately 31456000.
Thursday, August 13, 2009
Interactive Web-Based Model Viewing - Part Uno
You can use the Autodesk Seek Viewer plug-in as a viewer that is even lighter and easier to use than Design Review to view your Revit models (DWF versions) on the web:
1.) Once you have your Revit model published to a 3D DWF, go to the Autodesk Seek website and select a family to view 3D in the Autodesk Seek Viewer
2.) If you haven't been to the Autodesk Seek website before, download and install the plug-in - save the plug-in, you'll want it later.
3.) Once installed and viewing the family, right-click and selectcopy the source code to a blank notepad document.
4.) Sift through the code (there's not a whole lot to it) and replace the source location of the Autodesk Seek family with the location of your DWF. There are additional parameters for background color and gradient, initial camera view parameters such as pitch, roll, elevation and zoom factor you can play with.
5.) Save the file with the .html file extension
6.) Open the .html file in Internet Explorer and Voila! You now can view your Revit model in a simple, lightweight, easy to use viewer on the web with all the same amenities (render modes, interactive splicer, etc) as the Autodesk Seek website.
Anyone who has ever been to the Autodesk Seek website and installed the Autodesk Seek viewer plugin can view these right away; and what about the rest who have not? Well, you'll have to put a link on your website so they can install it on there machines; that's why I suggested to save the plug-in when downloading it from Autodesk. :D
This is a great tool for marketing a large multi-unit development where you could have an online Site Plan of the development and graphically link to an interactive 3D model of each unit. And it's simple enough that Joe-Shmo off the street can use it; a lot easier to use and less involved than Design Review.
1.) Once you have your Revit model published to a 3D DWF, go to the Autodesk Seek website and select a family to view 3D in the Autodesk Seek Viewer
2.) If you haven't been to the Autodesk Seek website before, download and install the plug-in - save the plug-in, you'll want it later.
3.) Once installed and viewing the family, right-click and select
4.) Sift through the code (there's not a whole lot to it) and replace the source location of the Autodesk Seek family with the location of your DWF. There are additional parameters for background color and gradient, initial camera view parameters such as pitch, roll, elevation and zoom factor you can play with.
5.) Save the file with the .html file extension
6.) Open the .html file in Internet Explorer and Voila! You now can view your Revit model in a simple, lightweight, easy to use viewer on the web with all the same amenities (render modes, interactive splicer, etc) as the Autodesk Seek website.
Anyone who has ever been to the Autodesk Seek website and installed the Autodesk Seek viewer plugin can view these right away; and what about the rest who have not? Well, you'll have to put a link on your website so they can install it on there machines; that's why I suggested to save the plug-in when downloading it from Autodesk. :D
This is a great tool for marketing a large multi-unit development where you could have an online Site Plan of the development and graphically link to an interactive 3D model of each unit. And it's simple enough that Joe-Shmo off the street can use it; a lot easier to use and less involved than Design Review.
Subscribe to:
Posts (Atom)