This is an elaboration of my post 'Interactive Web Based Model Viewing - Part Uno' - it looks at using the Autodesk Seek Viewer to view Revit models online - here is the original post.
It was a little tricky to get this to embed into my blog but I think I got it workable. By now, you should have already been prompted to run the Autodesk Seek Viewer add on and you should be able to see the model in the viewing window. If not, here is the direct link to the Autodesk Seek Viewer; just extract the .zip file and run the .exe file.
This example is using one of the sample projects from RAC 2011. As you can see this can be quite a valuable and lightweight tool. Right click in the viewing window somewhere and you can view the various settings and tools you have to play with - I especially like the Interactive Slicer.
Go ahead - have at it! It works very similiar to Revit as in panning, zooming, etc.

Thursday, February 18, 2010
Split-Face with Wall Reveal
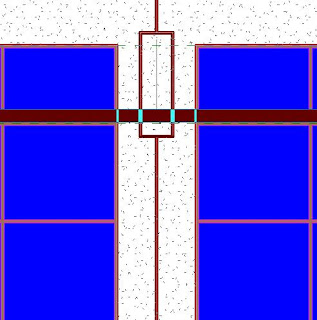
Have a complex wall/reveal design? Maybe EIFS reveals? Let's say you have a reveal in a wall and you need to have the portion of the wall above the reveal 'Color A' and below it 'Color B' - when you try and use your Paint Bucket it wants to select the entire face of the wall (Figure A), not the individual faces (above and below the reveal).
So the next logical step would be to use the Split-Face tool to split the wall face at the reveal location so you can have multpile faces to paint. After further investigation and frustration we see that when we select the wall face to split it, it automatically has the reveal edges assigned as a face border - so we can't split our faces along those lines. Now we could offset our split-face lines a teenie bit off the border lines but that would be cumbersome and annoying.
Well While going through this I discovered an long standing bug in the software, try this:
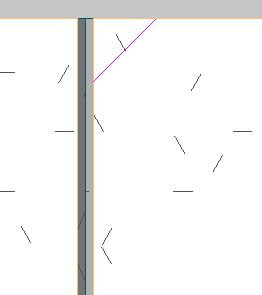
- Use your Split-Face tool and pick the wall face you would like to Paint.
- Split the face of the wall anywhere, I do it in a top or bottom corner and create a tiny 1/16"x1/16" wedge (Figure B). Select Finish Sketch.
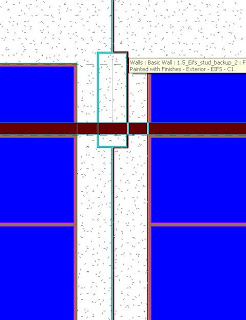
- Now you will be able to pick the individual faces of the wall created by the reveal (Figure C).
Thursday, February 11, 2010
Curb and Gutter Along Topo
Want to create a curb and gutter that actually follows your topo elevations? Tired of using complex slabs or sloped sweeps? Well here's an alternative way that creates a curb and gutter to follow the EXACT topography of your site plan! The only downside I have found to this method is that you need to be sure your topography is final (or darn close) and won't change at the areas of the curb and gutter - it can be a nightmare to change after the fact - you'll see why as you go through this tutorial.
Happy Curbing!

Happy Curbing!
- Create your toposurface as normal - making sure your elevations, etc are nailed down prior to moving on the the next step. :)
- Use the Split Surface tool to split the surface into 3 parts, forming your road - you'll have to do this twice as the Split Surface tool only allows you to split the surface into two parts each time.
- On each side of the road, use the Split Surface tool again to split the surface into (2) 6" (or whatever your specs) pieces or slivers outward from each side of your road - this will later become the top of your curb and your gutter.
- Go to an elevation view and move the road, and the two inside most 6" pieces (your gutters) down your required curb height.
- Assign the appropriate materials to the roadway, curbs and topo (asphalt, concrete and grass) - now you can see things shaping up.
- Now, using the Split Surface tool again, Split each of the four 6" spaces 1/8" from the their shared edge - creating (2) 1/8" slivers of curb in between each of the two 6" pieces.
- Finally, go to a 3D view and use the Merge Surfaces tool and select the lower 1/8" curb piece and then the upper 1/8" curb piece - this will join the two 1/8" pieces to create your curb wall.
Subscribe to:
Posts (Atom)